Knowledge Base Article
How To Get Started with Argenta (Onboarding)
Welcome to Argenta. This walks you through setting up your organization in the order that causes the least rework. You do not have to finish it in one sitting, but the first four steps are worth doing before you invite the rest of your team in.
The Get Started card on your dashboard
While your account is new, your dashboard carries a Get Started with Argenta card with five steps on it:
- Import your data
- Upload your logo
- Turn on online giving and ecommerce
- Invite your team
- Make your subscription payment
Each step ticks itself as soon as you have done it, read from your own records, so there is nothing on the card for you to keep up to date. A line at the top shows how many are done.
Every step has an orange Go button that takes you to the page for that step. Once the step is done the button turns green and reads Done, and it still works, so you can go back whenever you like.
The small X in the top corner hides the card, and only for you, not for your colleagues. It is not gone: go to /get-started and the card is there whatever you have hidden and however far along you are. When all five steps are done the card says so once, then retires itself for good.
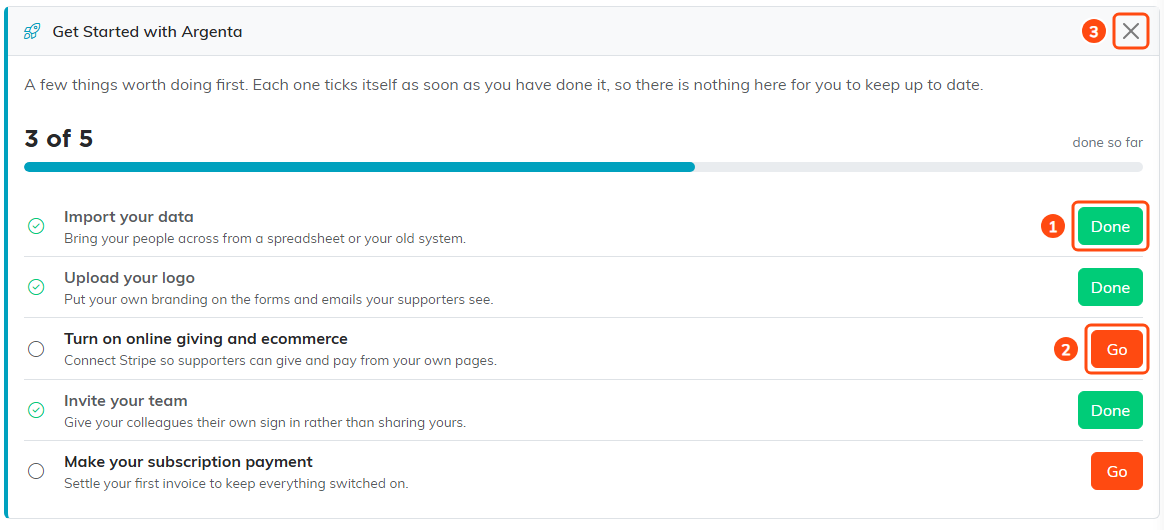
1 a step already finished. 2 a step still to do, click Go. 3 hides the card, and only for you.
Where setup lives
Almost everything below is under Settings, the gear icon at the top right of the screen. That menu appears for Master Admins and Subscription Admins, so if you do not see it, ask whoever set up your account to grant you access or to do these steps for you.
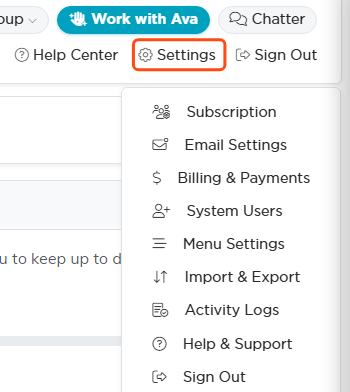
Settings is the gear at the top right. Nearly every step below starts here.
Step 1: Check your subscription
Go to Settings > Subscription and confirm your organization's information is right. This is the record everything else hangs off, so fix any typos in your organization name now rather than after your public forms are live. While you are there, upload your logo and signature so they appear on your forms. See Adding Organization Information and Logo. Billing & Payments in the same menu is where your plan and payment details live.
Step 2: Add your team
Go to Settings > System Users and add the people who need to sign in. Give each person the access their job needs and no more. It is much easier to open access up later than to explain why someone saw something they should not have.
Step 3: Turn off what you do not use
Go to Settings > Menu Settings. Argenta covers a lot of ground, and no organization uses all of it. Hide the sections you do not need, or set them to admin only. A shorter menu is the single biggest thing you can do to make Argenta feel easy for your staff on day one. You can turn anything back on later, and each person can also adjust their own menu.
Step 4: Set up your email
Go to Settings > Email Settings. This is where you set the address your notifications come from and verify it, so the email Argenta sends on your behalf actually reaches inboxes. Do this before your first campaign or your first public form, not after.
Step 5: Bring your data in
Go to Settings > Import & Export to open the Import & Export Hub. Pick the kind of record you want to bring in and Argenta walks you through the same five steps every time. Recent Activity on that page shows how your past imports went. For the full walkthrough see Using the Import & Export Hub.
Two things that save pain here:
- Clean your spreadsheet before you import it. Fix duplicates and inconsistent names in the file, where it is quick.
- Start with your constituents. Almost everything else in Argenta points back at a constituent record.
Step 6: Set up how your organization is structured
If you track work by chapter, division, or department, set those up now so records can be tagged with them from the start. You will find all three in the Team menu, the button with your organization's name and a building icon at the top right. See Add A Chapter, Add A Division, and Add A Department.
Step 7: Start using it
With the setup done, work in whichever area matches your job. Constituents (CRM) holds your people, and Fundraising, Event Management, Volunteerism, Grant Management, Membership, and General Financials each build on those records.
When you need a hand
Click the orange question mark icons next to fields for a quick explanation of that field. For anything bigger, click Help Center at the top right of any screen, or go to Settings > Help & Support. Activity Logs in the same menu shows sign-in history if you ever need to check who has been in the system.
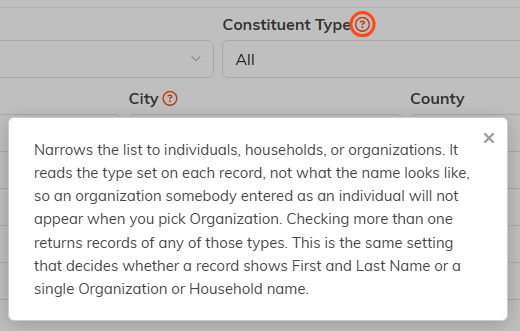
The orange question marks explain the field beside them. Hover for a quick look, or click to pin it open.
