Knowledge Base Article
Add Projects
Argenta has a project management system built in to help you plan and run your projects. Keeping tasks, files, notes, and information together in one place makes even a chaotic project much easier to control.
Add a project
- From the main menu, choose Workflow & Productivity > Project Management. This opens the project list.
- Click Add A New Project. A short form asks for the project title. Press Add & Enter Details and Argenta creates the project and takes you straight to the Project Details page inside the project workspace. Everything else is on that next screen. Change your mind and Cancel & Exit leaves nothing behind.
- Fill in the details below, then save.
Fields marked with an orange asterisk should be completed. Project Title, Date Requested, Desired Due Date, and Actual Due Date must be filled in before the project can be saved. Project's Current Status and Priority also show an asterisk but start with a default value.
The view selector at the top of the list switches between List View, Board View, Calendar View, and Timeline View. The filter panel starts empty, showing every project, and it remembers the filters you used for as long as that browser tab stays open.
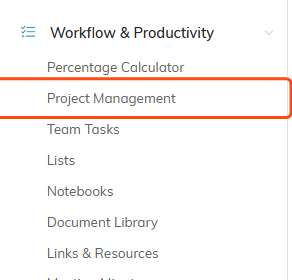
Project Management sits under Workflow & Productivity.

The view selector and Add A New Project sit above the list.
What each field is for
- Set As View Only / Lock This Record: two switches at the top of the page. View only lets others see the project but not edit it. Lock restricts access to the record.
- Project Title: up to 140 characters, with a counter showing how many you have left. Required.
- Project Progress: a meter that fills in automatically from your Project Tasks and how many are marked complete. There is nothing to enter here.
- Project Manager: the team member who owns this project. Team members are users, staff, board members, and volunteers designated as acting staff.
- Project's Current Status: carries the project through its life cycle, so keep it current. A new project usually starts as New.
- Priority: how urgent the work is.
- Project Group, Project Type, Project Category: optional lists your organization sets up, used to organize and filter projects.
- Fiscal Year and Project Budget: the year the project belongs to and its projected budget.
- Associated Client/Customer: if the project is tied to a client, start typing the name and select it. You can open the linked record or add a new one from the same box.
- Client's Hourly Rate and Billable Hours: what you charge and the hours you are charging for, if the project is billable.
- Date Requested: when the project was requested or created. Required.
- Desired Due Date: when the requester would like it finished. This may be a projection rather than the final date. Required.
- Actual Due Date: the real due date. It can match the desired date or differ, and you can change it later. Required.
- Completion Date: leave it blank until the project is done. When you set the status to Completed, Argenta fills this in for you if it is empty.
- Project Work Start Date and Projected Work End Date: when you expect work to begin and end. The start must be on or before the end.
- None of Desired Due Date, Actual Due Date or Completion Date can be earlier than Date Requested. The same day is fine.
- Projected Work Hours: your estimate of the hours the project will take.
- Actual Work Hours: calculated automatically from the hours logged on your project tasks, so there is nothing to enter here.
- Chapter, Division, Department: where your organization uses them.
- District and Precinct: political teams only. Select the district first, then the precinct.
- Request A Status Update: the button at the top of the Project Details card emails the assigned project manager to ask where things stand. Assign a project manager first.

The two switches at the top of Project Details.

Title, with the progress meter that fills itself in from your tasks.

Who owns it, where it is, and how urgent it is.

The three optional lists your organization sets up.

Fiscal year and the projected budget.

The client the project belongs to, and what you are charging.

Three of these four dates are required before the project will save.

Actual Work Hours adds itself up from the hours logged on your tasks.

Chapter, Division and Department, where your organization uses them.
Saving your project
The buttons at the bottom of the page are Save & Continue to save and keep working, Save & Exit when you are finished, Copy & Add New to save a copy as a new project, Delete This Record, and Cancel & Exit to leave without saving your latest changes. You can also click the Save icon (a floppy disk) at the top right of the workspace at any time.

The buttons at the bottom of the page.
The project workspace
The workspace menu gives you everything needed to run the project from one place. Beyond Project Details you will find:
- Project Tasks: build and assign the task list, with hours and dates on each task. The progress meter and Actual Work Hours are driven from here.
- Sprint Planning: organize tasks into sprints.
- Project Checklists: create one or more checklists and add as many items as you need.
- Project Team: build the team and set each member's role and anticipated hours.
- Project Discussions: keep project conversation in one place. Click New Thread to start one.
- Meeting Minutes and Time Tracking: record what was decided and the time logged against the project.
- Client/Customer Billing: the billing tied to the associated client, including generating the invoice.
- Connections, Specifications, Project Spark, Notifications: linking related records, documenting specifications, and managing alerts.
- Project Files and Project Notes: attach files and add notes.
- Record Permissions: control who can view and edit this project.

The workspace menu, with everything the project needs in one place.
For help attaching a file, see Add Related Files. For help adding a note, see Add A Note to the Notes Section.
