Knowledge Base Article
Add Campaigns
A campaign is any push your organization makes toward one goal: raising money, filling an event, recruiting volunteers, or getting the word out. Create the campaign first, then everything you connect to it (donations, sales, leads, emails) rolls up into one place you can report on.
Add a campaign
- Go to Fundraising > Fundraising Campaigns. (The same list also sits under Marketing & Engagement > Campaigns.)
- Click Add A New Campaign. A short form opens asking for the Campaign Title. Fill it in and click Add & Enter Details, and Argenta creates the campaign and opens the Campaign Workspace on Campaign Details. Cancel & Exit leaves nothing behind.
- Fill in the details, then save.

Add A New Campaign sits above the campaign list.
What to fill in on Campaign Details
- Campaign Status. Required. New, In Preparation, In Progress, Ongoing, Closed/Complete, or On Hold. Status matters later: the public sales form only opens on In Progress or Ongoing.
- Start Date and End Date. Type a date or pick one from the calendar. Leave End Date blank and the campaign shows a Sells indefinitely badge, meaning it stays open until you close it. Argenta blocks an End Date that falls before the Start Date.
- Campaign Owner. Start typing a constituent's name and pick the person running the campaign.
- Campaign Title. Required. This is how you find the campaign in your list. Tick Include Title On Public Form if you want it shown on the public forms.
- Associated Fund. Start typing a fund name to tie giving from this campaign to a fund.
- UTM Code. Your tracking code, if you tag campaign links for web analytics.
- Campaign Type and Campaign Category. Both are for sorting and filtering later. Category is one of your own classification codes, so you can add a new one right on the field.
- Final Outcome. Leave this until the campaign wraps up, then record how it went. It is also a classification code you control.
- Chapter, Division, Department. Tie the campaign to one part of your organization. These also drive who can see it if you restrict users that way.
- District and Precinct. Political organizations only. Pick the District first, the Precinct list fills in from it.
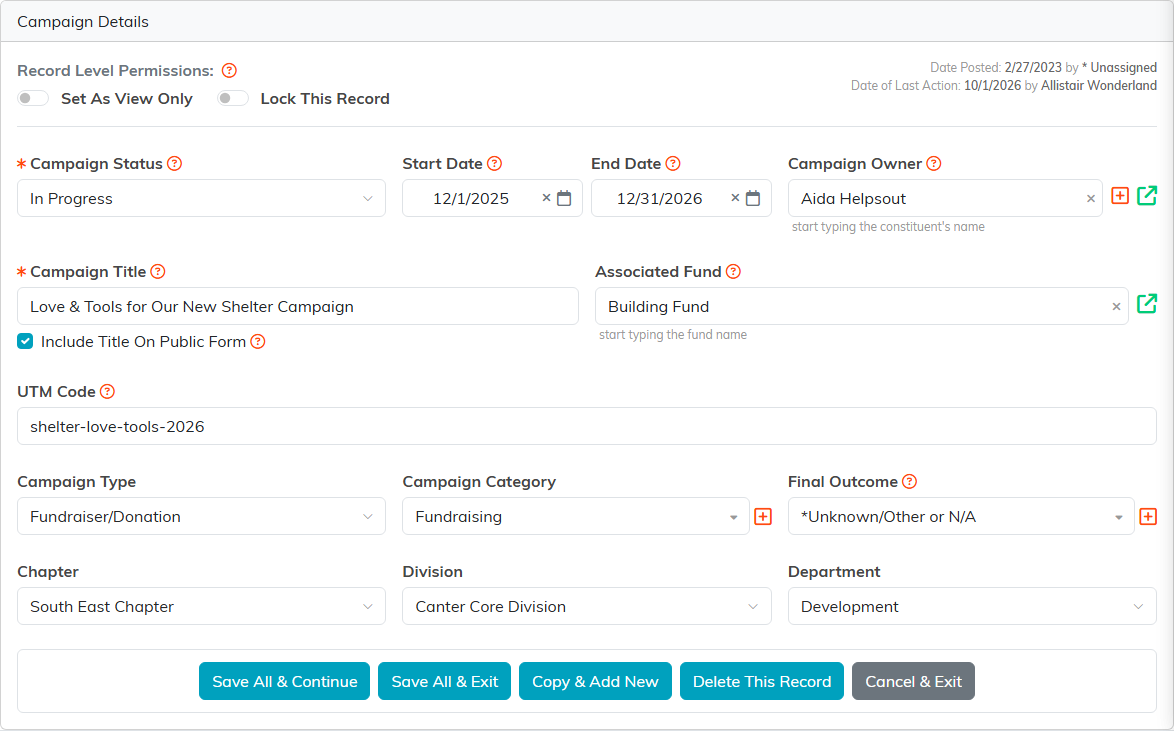
The Campaign Details tab. Required fields carry an orange asterisk.
Save it
Click Save All & Continue to save and stay put, or Save All & Exit to save and go back to your campaign list. The same button row also has Copy & Add New (duplicate this campaign), Delete This Record, and Cancel & Exit.

The button row at the bottom of Campaign Details.
What comes next
The other pages in the Campaign Workspace menu are where the campaign actually gets built out: Connections, Public Form Design, Email Batches, Sales Item Settings, Campaign Sales, Analytics & Metrics, Campaign Acquisition, Budget & Financials, Campaign Files, Campaign Notes, and Record Permissions.

The Workspace Menu is where the campaign gets built out.
For a tab-by-tab walkthrough see Overview, Working with Campaigns, and for editing an existing one see View and/or Update A Campaign.
