Knowledge Base Article
Getting Started with Email Automations
What Is an Email Automation?
An Email Automation sends a series of emails for you, automatically, one step at a time. You set it up once: you choose who gets enrolled (the trigger), which emails they receive and how far apart (the steps), and when emails should go out. From then on, Argenta runs the series for every person who enrolls, even while you sleep.
Example: a "New Donor Welcome" automation can send a thank-you the day someone makes their first donation, an impact story three days later, and an invitation to get involved a week after that. Every new donor gets the same warm welcome without anyone on your team lifting a finger.
Two building blocks to know before you start:
- Email Templates are the emails themselves. Every step in an automation sends one of your saved Email Templates, which you manage under Communication > Email Templates. Templates can include merge tags like [FirstName] or [OrganizationName] that fill in automatically for each person.
- Enrollment means a person has entered the series. Each enrolled person moves through the steps on their own schedule, based on when they enrolled, so two people in the same automation can be on different steps.
What You Need
- Access: you need the Mail Room Manager permission, or to be a Master Admin, to manage Email Automations, since they send email on your organization's behalf. If you see a permission message instead of the page, ask your administrator to switch on Mail Room Manager for your user.
- A From address: the email address your automation's emails will come from. You'll enter it on the automation itself.
- People with email addresses: a person can only be enrolled if their record has an email address and they haven't opted out of email.
Where to Find It
From the main menu on the left, choose Communication > Email Automations.
The Email Automations Page
This page lists every automation your organization has, each on its own card showing its name, its trigger, its status, and live counts: how many email steps it has, how many people are currently enrolled, how many have completed it, and how many emails it has sent. You can search by name, filter by status, sort, and export the list to CSV.
Each card has three quick actions: the green Open icon opens the automation's workspace, the orange Archive icon retires it safely, and the pink Delete icon removes it permanently (more on those at the end). The Archive icon is not shown on an automation that is already archived, and if you are view-only, on your whole account or on the Mail Room Manager permission, neither Archive nor Delete appears, leaving only Open.
Every automation is always in one of four statuses:
- Draft: still being built. Nothing sends, and nobody enrolls automatically.
- Active: running. New matches enroll automatically and due emails go out.
- Paused: temporarily stopped. Nobody new enrolls and nothing sends, but everyone keeps their place in the series.
- Archived: retired with all of its history kept. It can be reactivated any time.
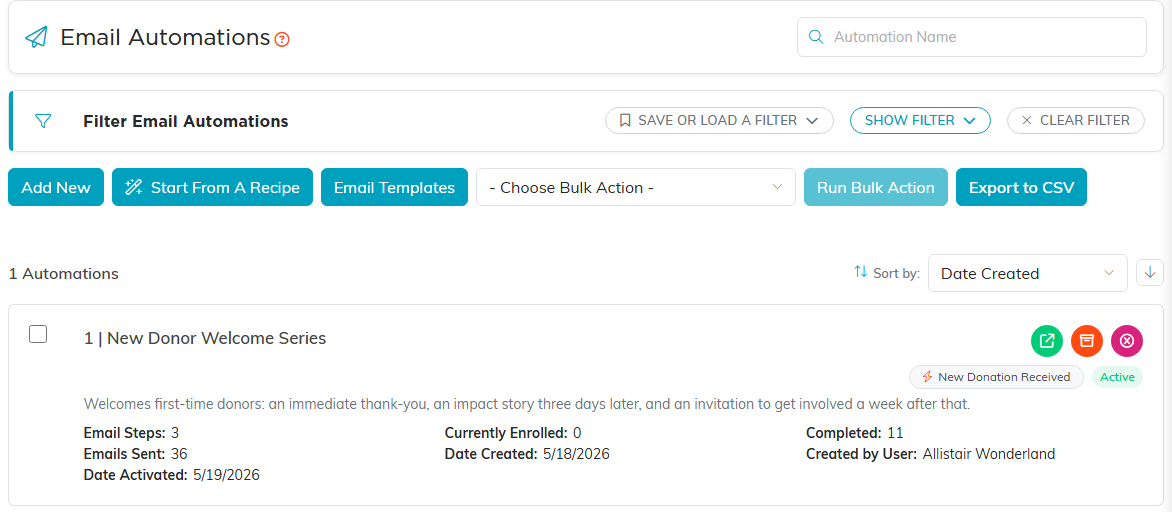
Each automation shows its trigger, whether it is active, and how many people are enrolled.
The Fastest Way to Start: Use a Recipe
A recipe builds a complete, ready-made automation in one click, including starter emails written for you. It's the easiest way to create your first automation.
- On the Email Automations page, click Start From A Recipe.
- Pick a recipe and click Use This Recipe:
- New Donor Welcome: triggers on every new donation. An immediate thank-you, an impact story three days later, and a get-involved invitation after ten days.
- Volunteer Onboarding: triggers when a new volunteer is added. A warm welcome, a what-to-expect note two days later, and a community introduction after a week.
- Lapsed Donor Win-Back: you hand-pick which donors to enroll, and the series stops automatically for anyone who gives again. A "we miss you" note, a look at what their past support built five days later, and an invitation to return after twelve days.
- Argenta builds the whole automation as a Draft and opens it for you. The recipe also creates its own starter Email Templates on your account, named after the recipe, so you never start from a blank page.
- Personalize the emails. Open Communication > Email Templates, find the templates named after your recipe (for example, "New Donor Welcome: Your Impact"), and edit them to tell your organization's story. Each starter email marks the spots to fill in.
- Send yourself a test of each step (see Test Before You Launch below).
- Click Activate Automation when you're ready. Nothing sends until you do.
Building One From Scratch
Click Add New on the Email Automations page. Argenta asks for an Automation Name first, then you click Add & Build It. The draft automation is created and the Email Automation Workspace opens. It has four areas, top to bottom: Automation Details, the enrollment and sending settings, the Email Series, and Enrollments.
1. Automation Details
- Automation Name and Description are for your team's reference; your audience never sees them. The name is required. If you clear the Automation Name box and save, Argenta refuses the save and shows a message beside the box.
- From Email Address is the address the emails come from. It's required before you can activate, and it has to be a real email address. If you type something that is not one, Argenta repeats it back to you and leaves the automation as it was.

The name is for you. The From address is what a donor actually sees.
2. Choose the Enrollment Trigger
The trigger decides who enters the series. In the "Who Gets Enrolled & When Emails Send" section, pick one:
- Manual Enrollment: nobody enrolls automatically; you hand-pick each person in the Enrollments section. Best for curated audiences, like a win-back series.
- New Constituent Added: anyone added as a new constituent enrolls automatically.
- New Donation Received: anyone whose donation is recorded enrolls automatically. Great for thank-you and stewardship series.
- New Volunteer Added: anyone added as a volunteer enrolls automatically.
- New Member Added: anyone added as a member enrolls automatically.
- Member Of An Email List: everyone already on the email list you choose enrolls once the automation is active, and new list members enroll as they join. Picking this trigger reveals an Email List dropdown where you choose the list.
- Lead Reaches A Status: a lead created at the status you choose, or moved to it after you activate the automation, enrolls its person. Picking this trigger reveals a Lead Status dropdown and a Statuses That Keep Them In list. The person stays in the series while their lead sits at the chosen status or one you tick there. Once it moves to any other status, they leave the series as Removed and get no more of its emails. Great for sales follow-up.
Good to know: the automatic triggers (new constituent, donation, volunteer, member, lead status) enroll people going forward, from the moment you activate. They don't reach back and enroll everyone already in your database. The Email List trigger is the one exception: it brings in the list's existing members too. While an automation is Active, Argenta checks for new matches about once a minute.
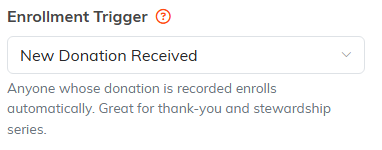
Pick the trigger and the text underneath tells you who it will enroll.
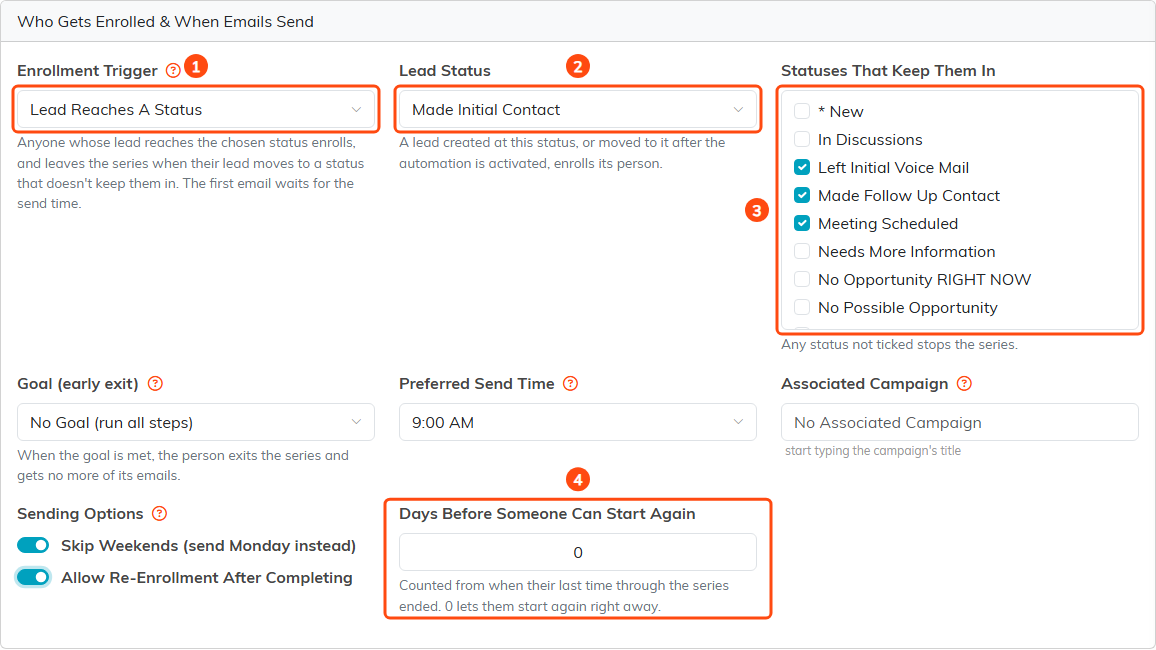
1: the trigger. 2: the status that enrolls someone. 3: the statuses that keep them in. 4: how long before they can start again.
3. Set a Goal (optional)
A goal ends the series early for anyone who reaches it:
- No Goal (run all steps): everyone receives every step.
- Donation Received (exit the series): as soon as a person's donation is recorded, they exit the series and get no more of its emails. Use this on fundraising-ask series so nobody is asked for something they already did. People who exit this way show as Goal Met.
- Mission Trip Enrolled (exit the series): as soon as the person enrolls in a mission trip, they exit the series and get no more of its emails. Use this on a series that promotes a trip, so it stops selling to somebody the moment they book. On a Lead Reaches A Status automation, it also keeps the series from starting for anyone already booked on a trip that has not ended yet. This goal is offered only if your team uses Mission Trips.
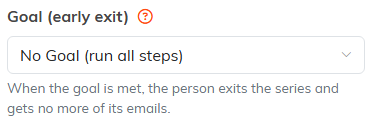
A goal is the early exit. Leave it as No Goal and everyone gets the whole series.
4. Choose When Emails Send
- Preferred Send Time: the hour of day your emails go out, like 9:00 AM.
- Send Until (optional): leave it on No Window to send at that one hour. With No Window, a first email set to 0 days that comes due after that hour still goes out right away, so a welcome arrives the same day; in a Lead Reaches A Status series it waits for the next Preferred Send Time instead. Pick a later hour and the series can send any time from the Preferred Send Time up to this hour, so a first email that comes due inside that window goes out within a few minutes, a Lead Reaches A Status one included. Nothing from the series goes out after the window closes; it waits for the next Preferred Send Time.
- Skip Weekends (send Monday instead): any email that would land on a Saturday or Sunday moves to Monday.
- Allow Re-Enrollment After Completing: lets someone go through the series again if they match the trigger again after finishing it. Leave it off to keep the series strictly once per person. In a Lead Reaches A Status series, turning it on also shows Days Before Someone Can Start Again: how many days after their last time through the series ends before they can enroll again. 0 lets them start again right away.
- Associated Campaign (optional): ties the automation's emails to one of your campaigns for reporting.
Save your settings any time with the Save icon (a floppy disk) at the top of the page or the Save All Changes button at the bottom.
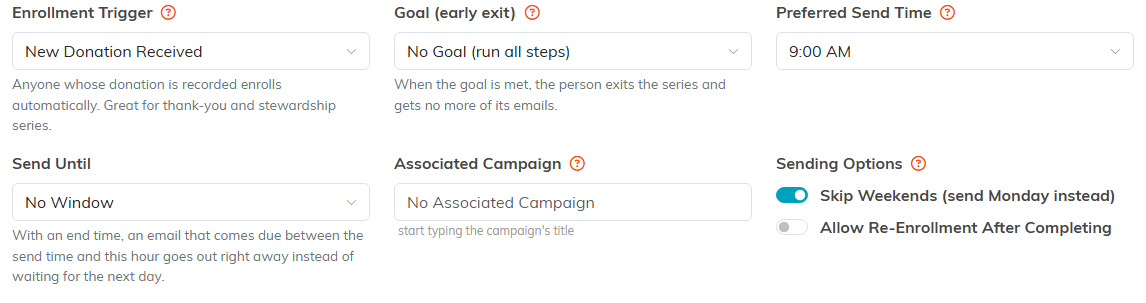
One send time for the whole series, and an optional Send Until hour that turns it into a window.
Build the Email Series
The Email Series section shows your series as a timeline: enrollment at the top, each email with its wait time between, and the finish line at the bottom.
Click Add Email Step. Each step has three settings:
- Email Template: the email this step sends, chosen from your Email Templates. Merge tags like [FirstName] fill in fresh for each person at the moment their email goes out.
- Days After Enrollment, for every step, counted from the day the person enrolls: how long to wait, from 0 to 365 days. 0 sends it the same day; 3 waits three days and then sends at your preferred send time. No one gets two emails from the series on the same day: if an earlier email went out late, after a skipped weekend for example, the next one keeps its planned gap after it.
- Subject Override (optional): gives this step its own subject line without editing the template. Leave it blank to use the template's subject.
Click Save Step, then repeat for each email in the series. On the timeline, every step shows its template and subject, and once it has started sending, how many emails went out and how many were opened.
Each step also has three small buttons: the green paper plane sends you a test, the orange pen edits the step, and the pink circle removes it. When you remove a step, the remaining steps renumber automatically.
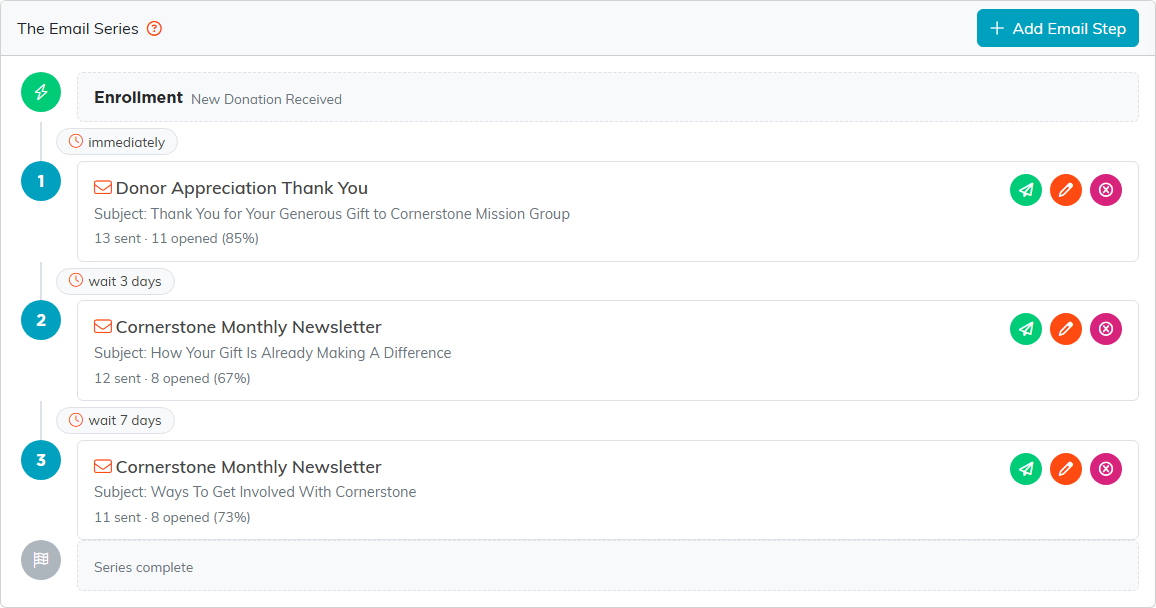
The whole series at a glance: each email, the wait before it, and how many opened it.
Test Before You Launch
Click the green paper plane on any step and that step's email is sent to your own inbox with [TEST] at the start of the subject. The merge tags fill in with your own information, so the preview reads like the real thing. Send yourself as many tests as you like; they never count toward the automation's statistics. Two things have to be in place first: a real From Email Address (the automation's, or the step's template if the automation's box is empty), and an email address on file for your own user account. If either one is missing, Argenta tells you which instead of sending.
Activate It
Click Activate Automation. Before anything can send, Argenta checks that the automation has at least one email step, a From email address that is a real email address, a chosen Email List if it enrolls from one, and a subject on every step (from its template or a Subject Override). If something is missing, or the From address is not a real one, a message tells you exactly what to fix. Activation is also refused while email sending is suspended for your account; the message then asks you to contact Argenta Support.
While the automation is Active, new trigger matches enroll automatically and due emails go out on schedule. Pause Automation stops everything instantly: nobody new enrolls and nothing sends, and everyone keeps their place in the series until you click Resume Automation.
Enrolling People Yourself
Whatever the trigger, you can always add individual people by hand. In the Enrollments section, start typing a name under Enroll Someone Manually, pick the person, and click Enroll. (The automation needs at least one email step first.)
A few rules protect your audience, and they apply to manual and automatic enrollment alike:
- Only people with an email address on file can be enrolled, and a record marked deceased never is.
- Anyone who has opted out of email is never enrolled, and anyone who unsubscribes mid-series exits automatically.
- Each person goes through a given automation only once. With Allow Re-Enrollment After Completing on, they can enroll again after they leave the series, but never twice at the same time, so nobody ever receives duplicate series.
- People you enroll while the automation is still a Draft simply wait; their emails begin once you activate.

Start typing a name to put one person into the series by hand.
Exactly When Emails Go Out
- A first step with a 0-day wait sends the same day someone enrolls: at your preferred send time if that hour is still ahead, or within a few minutes if it has already passed. Welcome emails arrive while the moment is still warm.
- In a Lead Reaches A Status series with no Send Until window, the first email always waits for your Preferred Send Time, even with a 0-day wait: later that day if the hour is still ahead, otherwise the next day.
- With a Send Until window, in any series, a first email with a 0-day wait goes out within a few minutes when it comes due inside the window, and otherwise at the next Preferred Send Time. An email that comes due after the window closes waits for the next opening too.
- Every later email lands on its scheduled day at your Preferred Send Time.
- With Skip Weekends on, Saturday and Sunday sends move to Monday.
- To keep inboxes friendly, each person receives at most one automation email per day across all of your automations. If two series would email the same person on the same day, the second email simply waits for the next day.
- Every email honors your unsubscribe rules, includes the standard unsubscribe link, and is recorded in your Email Log like any other Argenta email.
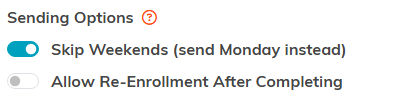
Skip Weekends pushes a Saturday or Sunday send to the Monday instead.
Watching It Work
The Enrollments section shows totals at a glance (Active, Completed, Goal Met, Unsubscribed, and All Time) and lists each enrolled person with:
- Progress: which step they're on, for example Step 2 of 3.
- Next Email: exactly when their next email is scheduled.
- Status: Active (moving through the series), Completed (received every step), Goal Met (exited early by reaching the goal), Unsubscribed (opted out mid-series), or Removed (taken out by you or, in a Lead Reaches A Status series, because their lead moved to a status that does not keep them in).
To take someone out of a running series, click the pink remove icon next to their name and confirm; their remaining emails stop immediately.
On the timeline, each step that has started sending shows how many emails were sent, how many were opened, and the open rate, so you can see which messages connect and which could use a better subject line. Opens are counted when the recipient's email program loads images, so treat the open rate as a helpful indicator rather than an exact count.

Four counters at the top of Enrollments. Unsubscribed is the one to keep an eye on.
See where one person stands
Open a person's record, or a lead's, and go to its Email Log. An Email Automations card above the log lists every automation they are or were enrolled in, with its status, their Progress (Step 2 of 5, for example), the date they were Enrolled, and the date of their Next Email while they are active, or the date they Exited once they have left, when there is one. The card only shows; nothing on it changes the enrollment. A Mail Room Manager or an administrator can click the automation's name to open it.

This donor finished all three emails of the welcome series.
Changing a Running Automation
You can edit an Active automation at any time: adjust its settings, edit a step's template or wait, add new steps, or remove steps. Changes apply to emails that haven't gone out yet; emails already sent are unaffected. If you're making several changes at once, the safest pattern is to Pause, make your edits, send yourself fresh tests, and Resume.
Archive vs. Delete
Archive retires an automation safely. It stops enrolling and sending, keeps all of its history and statistics, shows under the Archived status filter, and can be reactivated at any time.
Delete is permanent. It removes the automation, its steps, and its enrollment history, and stops any unsent emails. If there is any chance you'll want it again, archive it instead.
Quick Answers
- Nobody is enrolling. Check that the automation is Active (not Draft or Paused). Remember that the automatic triggers enroll new records going forward from activation, and a person needs an email address and email permission to enroll.
- An email didn't go out at the send time. The most common reasons: the person already received an automation email that day (it sends the next day instead), or the send fell on a weekend with Skip Weekends turned on.
- Someone got the first email but shouldn't get the rest. Remove them in the Enrollments section; their remaining emails stop immediately.
- Can one person be in two different automations? Yes. The once-per-automation rule applies within a single automation, and the one-email-per-day limit keeps their inbox comfortable across automations.
- Where do I edit the emails themselves? On the Email Templates page (Communication > Email Templates). Each automation step points at a template, so template edits apply to every future send of that step.
- Do I have to start over to reuse a retired series? No. Open the archived automation and click Activate Automation; it picks back up with all its history intact.