Knowledge Base Article
How to Design Public Donation Forms
The public donation form is the page your donors give through. You design it once and the same form serves your whole organization.
Opening the designer
Go to Fundraising > Public Donation Form. It is also listed under Our Public Interfaces.
The designer is split into six sections along the top. Pick a section, make your changes, and move to the next one. Your work is kept as you move between them, but nothing reaches the live form until you save.

The six sections of the designer.
Form Content
Use To Add A Headline Enter It Here to set the wording at the top of the form. Leave it empty and no headline shows at all.
Under the headline is a full editor for the rest of your wording, so you can explain what the gift pays for. Improve Body with AI will rework what you have written in the tone you pick beside it.
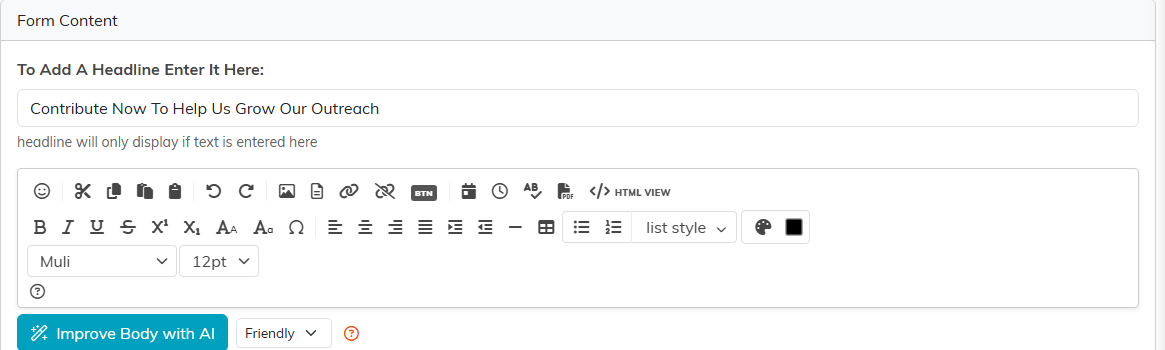
Form Content. The note under the headline box reminds you it only shows if you type something.
Choose Form Fields
Switch on only what you need. Every extra field costs you completed gifts:
- Mailing Address
- City, State, Zip
- Phone Number(s)
- Tribute Section: for gifts given in honor or memory of someone
- Solicited Section

Choose Form Fields. A donor's name and email are always asked for, so they are not switches.
Giving Amounts
These are the six buttons a donor sees before they reach the box where they type their own figure.
- Fill them in from Amount 1 upward, smallest first.
- Leave one blank and it keeps whatever is set now.
- Enter 0 to hide that button.
- A donor can always type their own amount instead, whatever you set here.

Giving Amounts.
Choose Form Colors
Set the form's colors to match your branding. Type a hex code, or click the dropper beside a box to pick a color.
- Headline and Icons each take one color.
- Amounts takes four: the button color, the color it turns under the mouse, and the text color for each of those.
- Buttons takes three: the color, the color under the mouse, and the text color.
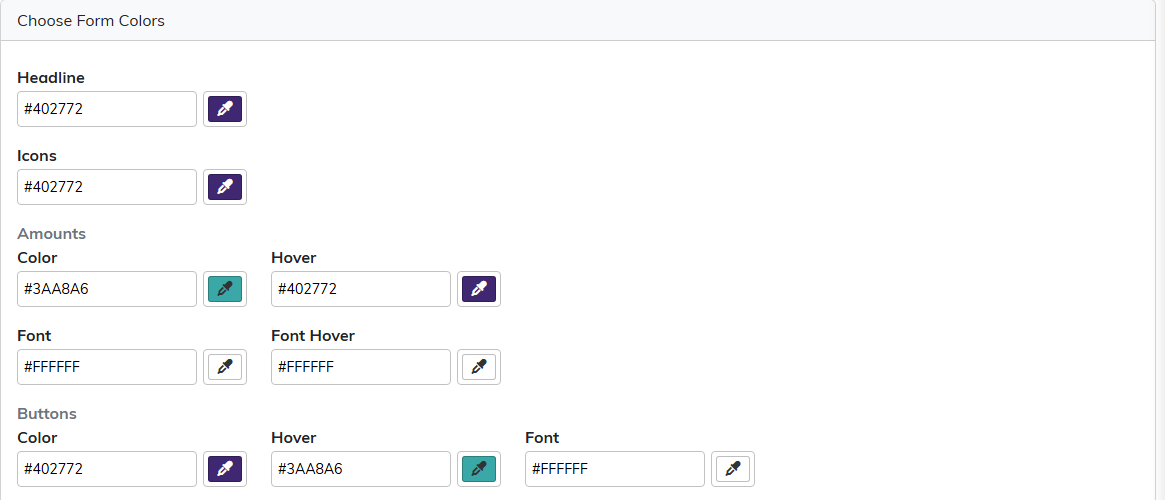
Choose Form Colors.
Form Banner Image
Display Hero Image turns the banner across the top of the form on and off. Below it you upload pictures and pick the one you want, and you can group them into folders to keep them straight.

Form Banner Image.
Share This Form
The Share This Form section holds the form's Public Link with a Copy button next to it, and a QR code you can save with Download PNG or Download SVG. It also tells you how many times the link has been opened, and you can switch the short link off. Turning it off makes that short link stop working everywhere it was shared, a printed QR code included; it does not swap the card over to the full address.
Copy the link for email and social. Use the PNG of the QR code for everyday printing and the SVG for anything large, like a banner or a poster. Scan it yourself before it goes to the printer.
Checking it before you publish
- Click Save & Preview to save your edits to the live form and see it the way a donor sees it. On a view-only account the button reads plain Preview.
- Save Settings writes your changes and leaves you in the designer, which is what you want while you are still working.
- Save & Exit writes them and closes the designer.
- Exit leaves without saving.

The buttons sit at the bottom of every section.
Best practices
- Ask for as little as possible. Address and phone are optional for a reason.
- Look at the form on a phone as well as a computer, since much giving happens on a phone.
- Set suggested amounts that match what your donors actually give.
