Knowledge Base Article
How to Use the My Sessions Card on Your Dashboard
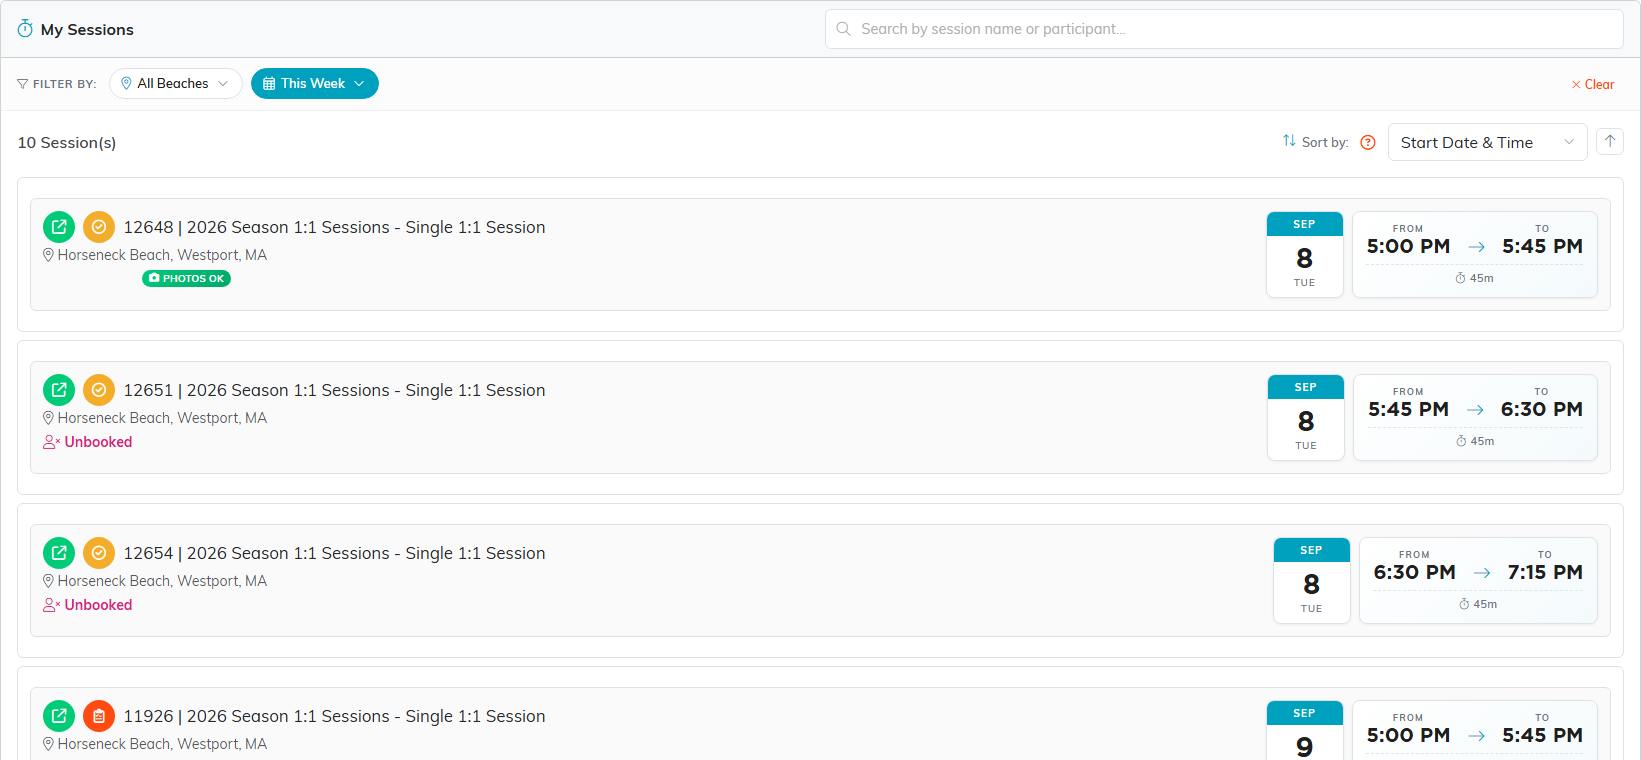
If you are rostered to work sessions, your Dashboard carries a card called My Sessions. It lists every session you are down to work, and the filters across the top decide which of them you are looking at.

How many hours did I work this week?
This is what most people open the card for, so it is worth putting first.
- Go to your Dashboard.
- On the My Sessions card, find the Filter by row.
- Click the date pill, the one with the calendar icon, and choose This Week.
- Read the count above the list. It tells you how many sessions match.
- Read Total, beside that count. It is the hours those sessions add up to.
The total follows your filters and your search. It is worked out from the rows on screen, so it always describes exactly the sessions you are looking at rather than your whole roster. A session missing either its start or its end time shows no length of its own, and adds nothing to the total.
This Week runs Monday through Sunday. A Sunday session belongs to the week that is ending, not the one about to start.
Filtering the list
The Filter by row has two pills, and they work together. A pill turns highlighted while it is narrowing the list.
- The location pill starts on All Beaches. Open it to pick a single location. The list offers only the locations your own sessions are at.
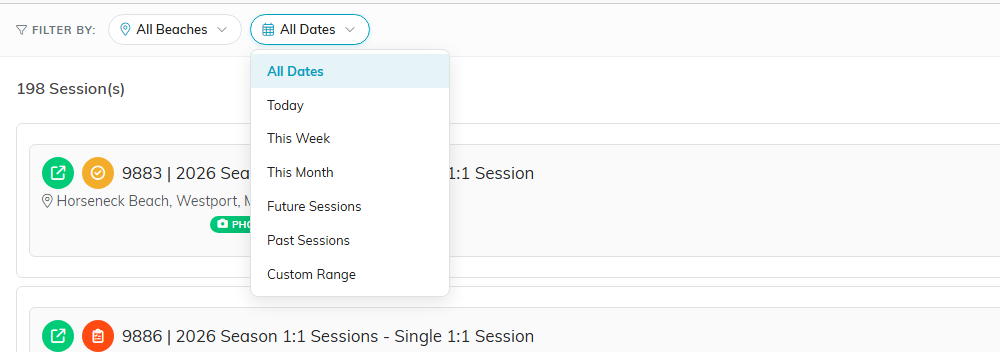
- The date pill starts on All Dates. It offers Today, This Week, This Month, Future Sessions, Past Sessions and Custom Range.
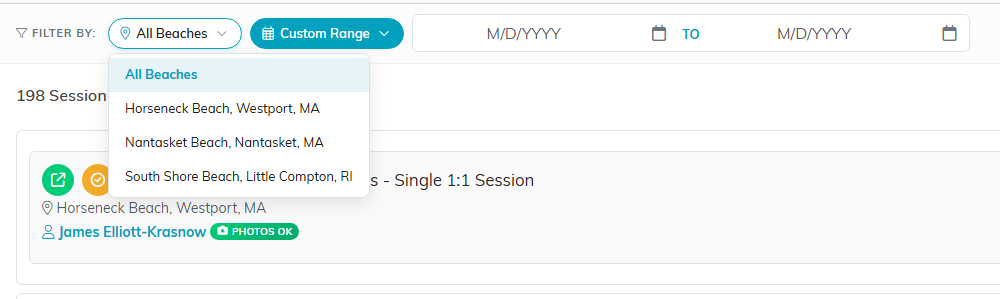
Choosing Custom Range opens a from and to date picker beside the pill. You can set one side and leave the other empty, which gives you everything from a date onward, or everything up to a date.

When any filter is on, a Clear button appears at the end of the row and puts the list back to everything.
Searching
The search box sits in the card header. It matches on the session name, the event the session belongs to, the participant's name on a one-to-one, and the session number.
Search runs on top of your filters rather than replacing them. If the date pill is set to This Week, searching looks only inside this week. Clear the filters first if you mean to search everything.

Reading a session row
Each row carries the same pieces:
- The title line is the session number, then the event it belongs to, then the session name.
- The location sits under the title, with a map-pin icon.
- The date tile on the right shows the month, the day of the month and the day of the week.
- The time strip shows FROM and TO. If the session ends on a different day, the finish date appears under the end time.
- The length sits at the bottom of the time strip, written as hours and minutes.

Under the location you will see one of these:
- Scheduled on a group session or a camp.
- The participant's name on a one-to-one, followed by their photo-permission pill.
- Unbooked on a one-to-one that nobody has booked yet.
The photo-permission pill
On a one-to-one, the pill beside the participant's name is the photo permission on file for them.
- Photos OK, in green, means permission has been given.
- No Photos, in red, means do not photograph them.
- Photo: Not Specified, in amber, means nobody has answered yet. Treat it as do-not-photograph until someone confirms.
Opening a session
The green button at the start of a row opens the session. The Session Team block on that page names everyone else working it with you.
Logging a session outcome
The button next to the green one is where you write the session up, and its color tells you where it stands. Orange Log Outcome means this session still needs writing up. Once you have, it becomes Edit Outcome.
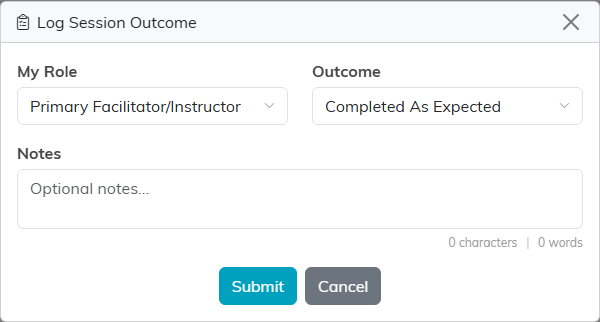
- Click the button on the session you want to write up.
- Set My Role. It offers your team's own roles, and it starts on the role you were rostered as.
- Choose an Outcome: Completed As Expected, Incomplete: Participant Didn't Show, or Incomplete: Couldn't Complete.
- Add Notes if there is anything to say. This is optional.
- Click Submit.
Reopening a session you have already logged gives you a Mark as Not Logged button, which puts it back to needing an outcome. The history of what you entered is kept.
On your own Dashboard you can always log your own sessions. On somebody else's schedule, Log Outcome and Edit Outcome appear only for an Event Manager or an admin, and not for a View Only user. Everyone else sees just the green button there.
Sending your schedule to Google Calendar
A row of calendar buttons appears above the list when you are looking at your own Dashboard. It does not appear when you are looking at somebody else's schedule.
- Click Connect Google Calendar and sign in to the Google account you want the sessions in.
- Once connected, click Sync my schedule to Google.
The sync covers your upcoming sessions for the next 180 days. Once you are connected, Argenta also keeps your Google calendar current by itself: when one of your sessions is moved, cancelled or handed to somebody else, the change reaches Google within a few minutes, without you pressing anything. Disconnect unlinks the account again and stops the updates.
